
Oauth2.0 구글 로그인 준비
https://console.cloud.google.com/apis
Google 클라우드 플랫폼
로그인 Google 클라우드 플랫폼으로 이동
accounts.google.com
위의 링크로 접속한다.

빨간색 네모 부분을 클릭한다.

"새프로젝트"를 클릭한다.

프로젝트 이름을 정한 후, "만들기"를 클릭한다.

새로 만든 프로젝트를 선택 한다.
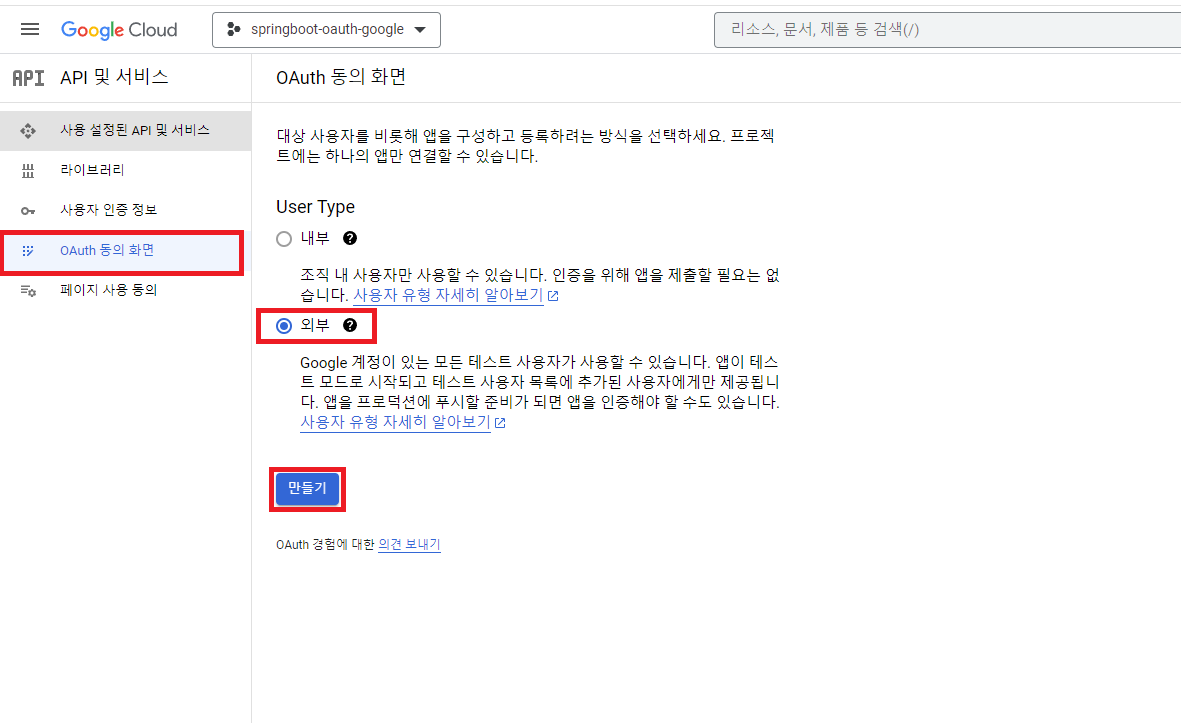
"Oauth 동의 화면" -> "외부" -> "만들기"를 클릭한다.

해당 부분을 채운 뒤 "저장 후 계속"을 클릭한다.
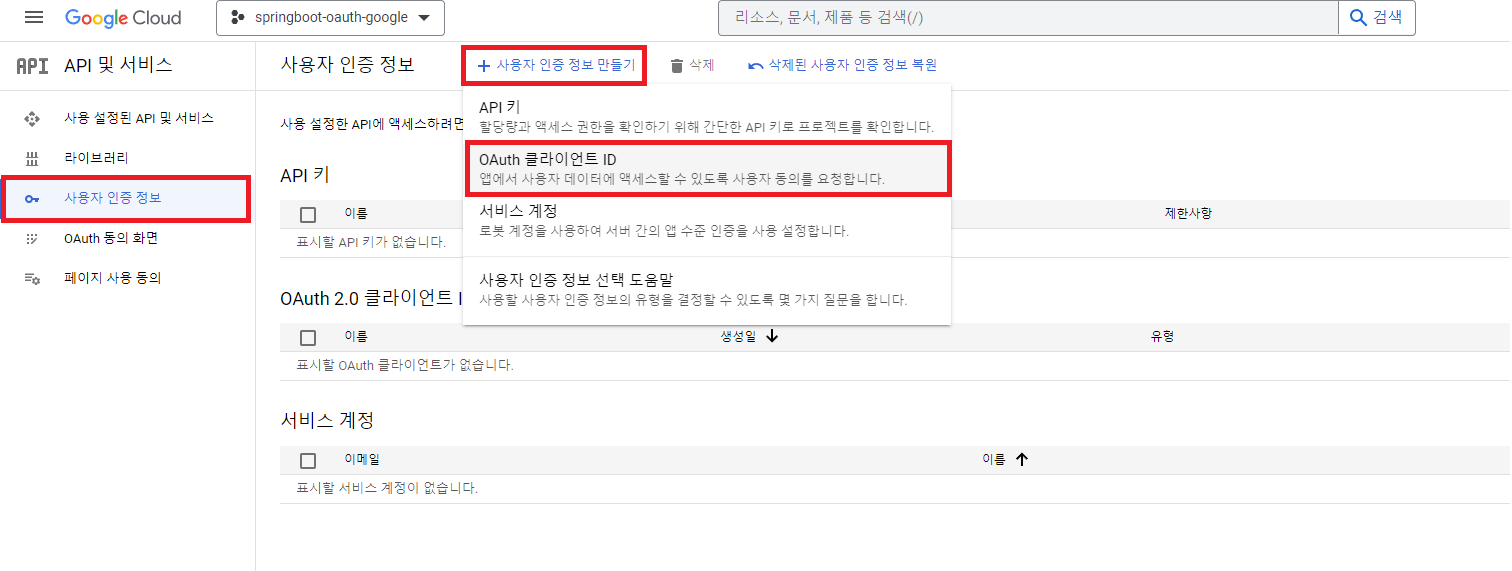
"사용자 인증정보" -> "+ 사용자 인증 정보 만들기" -> "OAuth 클라이언트 ID"를 클릭한다.

"웹 애플리케이션"을 클릭한다.

해당 네모 박스 부분을 채운뒤 "만들기"를 누른다.
Spring에서 Oauth2 라이브러리를 사용한다면
*/login/oauth2/code/google위와 같은 형식은 고정으로 해야 한다.
승인 코드를 받고 처리하기 위한 주소가 된다.

위의 과정들이 끝나면
"클라이언트 ID"와 "클라이언트 보안 비밀번호"가 발급된다.
implementation 'org.springframework.boot:spring-boot-starter-oauth2-client'위의 dependency를 추가한다.
application.yml
spring:
 security:
    oauth2:
      client:
        registration:
          google:
            client-id: <clientId>
            client-secret: <secretKey>
            scope:
              - email
- profile위와 같은 형식을 참고하여 yml을 작성한다.
loginForm.html
<!DOCTYPE html>
<html>
<head>
    <meta charset="UTF-8">
    <title>로그인 페이지</title>
</head>
<body>
<h1>로그인 페이지</h1>
<hr/>
<form action="/login" method="POST">
    <input type = "text" name = "username" placeholder="Username"/> <br/>
    <input type = "password" name = "password" placeholder="Password"/> <br/>
    <button>로그인</button>
</form>
<a href = "/oauth2/authorization/google">구글 로그인</a>
<a href = "/joinForm">회원가입을 아직 하지 않음</a>
</body>
</html>구글 로그인 버튼을 만들었다.
href의 링크
/oauth2/authorization/googleoauth2를 사용한다면 고정이다.
SecurityConfig
package com.example.security1.config;

import org.springframework.context.annotation.Bean;
import org.springframework.context.annotation.Configuration;
import org.springframework.security.config.annotation.method.configuration.EnableMethodSecurity;
import org.springframework.security.config.annotation.web.builders.HttpSecurity;
import org.springframework.security.config.annotation.web.configuration.EnableWebSecurity;
import org.springframework.security.crypto.bcrypt.BCryptPasswordEncoder;
import org.springframework.security.web.SecurityFilterChain;

@Configuration
@EnableWebSecurity  // 스프링 시큐리티 필터(SecurityConfig)가 스프링 필터체인에 등록이 된다.
@EnableMethodSecurity(securedEnabled = true, prePostEnabled = true)  //secured 어노테이션 활성화, preAuthorize, postAuthorize 어노테이션 활성화
public class SecurityConfig {


    @Bean //해당 메서드의 리턴되는 오브젝트를 IoC로 등록해 준다.
    public BCryptPasswordEncoder encodePwd() {
        return new BCryptPasswordEncoder();
    }

    @Bean
    public SecurityFilterChain filterChain(HttpSecurity http) throws Exception {
        http.csrf().disable();
        http.authorizeHttpRequests()
                .requestMatchers("/user/**").authenticated()  //인증만 되면 들어갈 수 있는 주소
                .requestMatchers("/manager/**").hasAnyRole("ADMIN", "MANAGER")
                .requestMatchers("/admin/**").hasAnyRole("ADMIN")
                .anyRequest().permitAll()
                .and()
                .formLogin()
                .loginPage("/loginForm")
                //.usernameParameter("username2")   -> html의 login받는 form에서 username을 username2로 바꾸면 PrincipalDetailsService의 username과 매칭이 되지 않는다.
                //그럴때 usernameParameter() 를 이용하여 바꾸어 주면 된다.
                .loginProcessingUrl("/login")
        /*
        loginProcessingUrl() :
        "/login"이라는 주소가 호출이 되면 시큐리티가 낚아채서 대신 로그인을 진행해준다.
        => "/login"을 만들지 않아도 된다. security가 대신 해주기 때문에
         */
                .defaultSuccessUrl("/")   //로그인이 완료되면 default인 메인페이지로 가게된다. 또한 특정페이지에서 로그인을 하면 그 특정페이지로 이동한다.
                .and()
                .oauth2Login()
                .loginPage("/loginFrom"); //구글 로그인이 완료된 뒤의 후처리가 필요함.

        return http.build();
    }
}oauth2 Login() 부분을 추가해 주었다.
test

구글 로그인이 추가되었다.
클릭해 보면 구글 로그인 폼이 등장한다.

'자바 탐구' 카테고리의 다른 글
| 스프링) SpringSecurity - 8) Oauth2.0 Authentication객체가 가질 수 있는 2가지 타입 (0) | 2023.05.26 |
|---|---|
| 스프링) SpringSecurity - 7) Oauth2.0 구글 회원 프로필 정보 받아보기 (0) | 2023.05.26 |
| 스프링) SpringSecurity - 5) Security 권한 처리 (0) | 2023.05.26 |
| 스프링) SpringSecurity - 4) Security 로그인 (0) | 2023.05.26 |
| 스프링) SpringSecurity - 3) Security 회원 가입 (0) | 2023.05.26 |